Pages

About Me

My photo
New England, United States

Sunday, October 21, 2012

Rats, Bats and Vultures, Oh No!

I have a cousin who shall remain nameless. She loves Halloween and throws a costume party every year. Next weekend is the big event and I thought I'd share some pics of what or who her guests will party with.


Entering the house into the kitchen, I am greeted by a not overly icky Fall mantle. She apparently likes rats. Yes, little white mice are cute...in a cage...in a laboratory.  She doesn't agree and thinks they should reside on the mantle.

Through the doorway on the left you enter the dining room.  Ya' know...where people dine.

All will be greeted by the Rodent Eating Vulture and more little white rodents. Oh! And snakes & dog bone candle holders. Yes, that is certainly how I'd like to see my Four Star restaurant table set up! "Would you like the Catch of the day, Little White Rat a la Stewart? We also have one special for $22.95, Slimy Black Snake, if you prefer." Yes...I can't wait to order.


Gazing across the room trying to avoid staring down the Rodent Eating Vulture & its prey, my eyes rest on the sideboard. Okay, the hat is cute and it dances & sings! My eyes move up and side to side! Just when things were going good! Corpse-like hands holding candles. I don't want them touching my food! Eyes quickly dart up seeking rest only to find The Shelf of Skulls. One can only wonder if they were previous patrons.


Changing chairs, I hope for a view of fall leaves and pumpkins. But no! The hostess thought a
Jailed Skull with bright blood red eyes would bring my appetite to the fore.  Yes, I have an completely crazy optimistic hostess. Apparently her restaurant's ambiance isn't geared toward those with red blood still running.


With a bit of despair, I move my eyes to the last wall. Whew! Birds on a branch, lights, ignore teeny black bats and...stink! Another skull with eyes alight for crying out loud.   Does the hostess really think that skulls make the living want to eat?


Alas, it's time to visit the Ladies Room and make sure that I still look normal...like having eyeballs in my  eye sockets and that my skin isn't green or gray. Close the door and turn around! SHE. DID. IT. AGAIN. A spider straight from the movie "Aliens" and Sigourney Weaver is not.at.the.party. Should've asked DIY Diva, Kit Stanley, along. She would turn them into grease spots on the floor.


Okay. I will just check my eyeballs and skin tone in the mirror and get out.  But, NO! The Alien Spider is getting ready to have dinner and has it's eye on a ROACH! Roaches turn my stomach. No entree for me thank you very much. Wash hands. Turn for towel.


And who do we meet face to face? Simon the Skeleton. "Let me assist you, dear." What? This is a Four Star Ladies Room with a servant now? And is he smiling? Yeah, you can't trust skeletons. He probably wants a tip, too.  They're always smiling...always. Zombies are their predecessors...just saying.

I think it's about time to leave this establishment.  I really would like dessert at least. I wonder if there is some small confection I could slip out with.


Fingers?  There are FINGERS for dessert?

I have a pot of homemade sauce and meatballs at home.  I don't have skulls, cockroaches, rodents, spiders or vultures. I have bittersweet vine and pressed Fall leaves. Okay...I have a spider here and there, but they die upon sight AND...


I have chocolate...in squares...not fingers. I may snag the bottle of Dracu-wine on the way out. I need it for my sauce. I'll leave the cape.

Oh! Be grateful I didn't show you the outdoor pictures.  Yep...be grateful.

Those of you who know me, know I don't celebrate Halloween nor do I judge those who innocently do so. However, I do like finding the humor in things and the centerpiece is a work of art as is the spider & bat laden chandelier above it. May you all enjoy the bounty of Fall, the Harvest Season...with or without rats, bats & vultures!


Tuesday, October 9, 2012

Waxen Leaves

Colors of Fall


Have you ever revisited a craft you did as a child? Sometimes it's fun to go back and relive a bit of it!  When I was very young, one of the things I was allowed to do was wax fall leaves.  All you need is colorful, real leaves that have fallen, wax paper and an iron.  Doesn't get much simpler.


Sandwiched!

Set your iron to medium hot and allow to heat up. Cut a piece of wax paper to lay the leaves on and lay a 2nd piece of wax paper over the top of the leaves.

Run your iron over the leaves melting the wax onto the leaves. Allow to cool and, if you have more leaves, repeat the process.

When cool, gently remove the top sheet of wax paper and remove leaves from the bottom sheet.

Bye-bye Summer...Hello Fall!


  It was time to say good-bye to my
  Summer starfish and welcome Fall.
  I  arranged a few leaves on some
  leftover white cardstock and
  reused the same frames.

Easy, Free Color!


I included a leaf from my Caladiums growing
on the side of the house. We'll see how they
hold up since they are tropical.

I had quite a few leaves left over and layered
them in the bowl on the dining room table with
my starfish and scallop shells.  Can't give up
the ocean fully regardless of the calendar!

Fall's Bounty


I added a vase of leaves from my variegated hydrangea, end of season hydrangea blooms and a stalk of garden mums.  These will last for weeks and, best of all, I already had all I needed!


Peek-A-Boo Starfish

When I get tired of the flowers, I'll move them and add a candle to the center...much easier to see my dinner guests! I'd like to fill the vase with lemons and/or limes for more color...but not tonight.


The starfish?  They are a reminder that Summer will come again in its time. For now, I have three other seasons to enjoy!

I hope you find time to relive a piece of your childhood and share the simple things with those you love.


Monday, September 24, 2012

Fade To Black


Lights, Shutters, Door Frame - CHECK!

Brass lights turned black - check! Shutters turned black - check! Storm door frame turned black - CHECK!!!! Thank God for Google and some really talented DIYers that have been posting for years.  How else would I have learned that I could paint my brass outdoor lights ... and shutters ... and the storm door ... and save some serious dollars in the process?

Go-To Guy Working

I've already posted about the lights and shutters. The storm door required some help getting it off and into the basement laboratory...bwahahaha (thanks, Ryan). There certainly was a learning curve. 

I hand-sanded Side 1, painted and was pleased with the result.  Hands ached.

For use on bare metal

On Side 2 I decided to try out my handy-dandy orbital sander....it took it down to bare metal no questions asked! Yikes! Now I had to add a step and use self etching primer before painting. Like I said...learning curve. Side 2 looked so good...so smooth! This is a self-leveling primer and looked great on it's own! It's found in the automotive section at Walmart.


Orbital & Discs

Sigh...so Side 1 had to be redone and let me tell you it required 80 grit sandpaper to get through that new coat of paint! I probably could've used 60 grit and used less discs.  


Two coats coming off


As you can see in the picture, it was quite a job. So thankful for my orbital sander. A wise, hand-saving $40 investment for sure!

Bare Metal


    Finally, down to bare metal! Even
    with 80 grit,it took about 8 discs,
    but well worth the effort.


Primed & Drying

 
Next I sprayed it down with the self-etching primer and let it dry for 24 hours.  I usually overdo the drying time, but as far as I'm
concerned, better safe than sorry!


Prep for Paint
(Still Brass)


    In addition to the door and door frame, the
    hardware and springs needed to be painted as did the
    vinyl molding strips that hold the window in.  I scuffed up
    the paint on the springs with sandpaper and then painted
    black using some black Rustoleum I already had on hand.
    The molding strips were wiped down with mineral spirits
    and I used Krylon Plastic Fusion on them...black, of course.

    However, the brass hardware was a different process. After
    a light sanding, I taped off the "working parts", coated with
    Kleen-Strip Sander Deglosser, let dry and then spray
                                        painted with Rustoleum's Oil Rubbed Bronze.

I actually did the springs, moldings & hardware first as I wanted them to cure for as long as possible before having to endure the weather in New England.

I used a 4 inch roller to paint the door as I didn't want brush strokes. Worked like a charm! There are places that required my 1 inch brush to get the paint on the edges, but that's not going to show.  And the final installed result looks like this!

Traditional Black, Tan & White.....so far!

If I had saved to do replacements:
Lights (2)                $80
Shutters (@ pair)    $75
Storm Door          $250 
Sub-Total             $405
CT Sales Tax       ~ $26
Approx. Total       $431

In reality,  my supplies cost $42.65. A $388 savings! Yikes!  Yes, I had a couple of the supplies needed already on hand.
                                                          
And that is one of the reasons I'm learning to DIY! You know....in addition to the stubborn-hard headed-I'll do it myself, uhm attitude perspective! Now to haunt Habitat's ReStore for two sets of shutters I can paint black for the side of my house!


Saturday, September 8, 2012

Kickin' Back, Enjoying Life!

The Storm Door is OFF!!!
Welcome to the last days of Summer! It almost seems that life is busier as an Empty Nester....or I just stay busier to compensate! I've been focused on finishing the facade of the house...though I've allowed myself a great deal of sidetracking procrastinating! So that post will have to wait, but here's a snippet.

The storm door finally came off thanks to my go-to guy, Ryan, and all manner of stuff has been happening to it in my laboratory basement.  What you see is a freshly painted, black frame! Bye-bye wineberry...Hellooooo Black!

This past week was filled with Nipo Time! Yes, my grandson ("Nipo") and his mom, Kara, came up for her sister's wedding. Kara was gracious enough to let me steal them for a couple of days & nights in the midst of the wedding excitement at her family's home.


A few minutes before they arrived at my home, this picture was taken in the car. He was listening to his uncle's music and was falling asleep holding the earbuds on!


A few minutes after they arrived at my home for a sleep over, Nipo & I got right down to business.  WATER FIGHT!! (What can I say? I rock!)


After a quick meal we headed outside for more fun and dessert. S'Mores, of course.

Daddy's Batman Sweatshirt


Since it was chilly, he got to wear the sweatshirt that I cross-stitched a Batman logo on for his Daddy when he was little.

I was so blessed to be able to teach him how to rock crab and cousin Neenie gave him his first fishing lesson....oh yeah...and his first driving lesson on the rider mower and there are way too many photos to use here! Yes, some of you may be breathing a sigh of relief.  That's okay.  Been there. For more photos, visit me on Facebook!

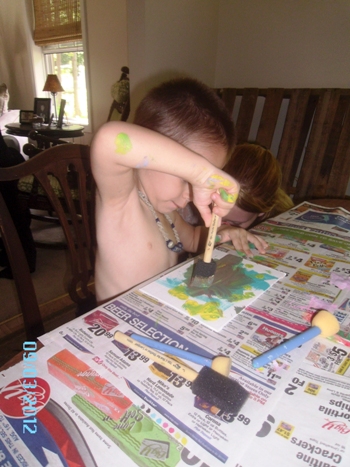
However, there are a couple more photos that pertain to DIYing! (I wasn't a total slacker.) I had a plan and it went like this: a six pack of 5" x 7" artist canvases and lots of craft brushes and paints. Here's what happened.

His smile says it all!


     He worked hard. He got into it.

     He had opinions.

     He was in his element.

     Hands & face sticky with paint.

     He made tough decisions on color and form.

     He gave it his all.


Just one more swirl.


He had many techniques and an almost endless variety of brushes and colors to work with.


And he gave his Nonna a most precious gift:
His personal, original artwork. 


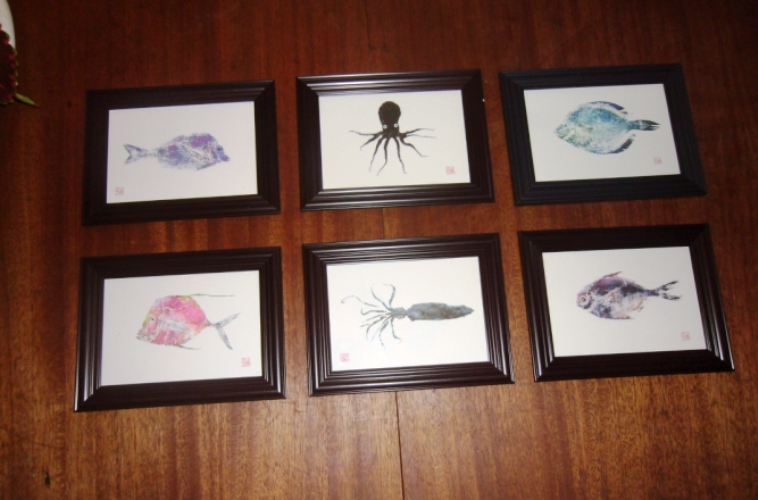
Nonna now has a set of six very special paintings to display in her home! Can we have a "Oorah!" for Dollar Store frames?! Perfect, I tell ya'! Seriously. I saw paintings like this at the renowned Mystic Art Festival in August. These?  I know the artist personally and it only cost me $6 for the frames and $2 for the canvases...and they're original paintings not prints!  Life is good.


While I was at it, I also framed (with Dollar Store frames) the set of fish print cards I bought at the art festival.  They're pretty cool, too, even if they are prints and I don't know the artist.

Hope you all are enjoying the last of our Summer days! Leaves are starting to fall (blech), humidity is lifting (woohoo!), great nights for fires (Ahhh), the water is still warm enough for swimming and fishing. Really, it doesn't get much better!

Take time to breathe deeply, be refreshed, and appreciate each of God's blessings He's dropping into your life...you might even miss them at first so look for them...I guarantee they are there. Sometimes it's not winning multi-millions or getting that new job (or a job).  Sometimes it's small, maybe bright and colorful...like six small original paintings.


Wednesday, August 29, 2012

Wednesday, August 15, 2012

Rainy Day (No Paint Fumes) and a Bench Pt 3

Finally, the wrought iron garden bench is done....well almost.  It still needs to be moved from my dining room to the yard!  Remember this poor thing?

Tuesday, August 14, 2012

Funky Pots

Finally, a chance to show you the Funky Flower Pots for next Spring!  My cousin, Janine, blessed me with a couple of plastic, fake terracotta pots. I promptly sprayed them with Krylon Fusion for Plastic in white satin and let them cure for a week or so.

Friday, August 10, 2012

Busy Bee & A Wedding

Hey, Everyone! It's been a bit hectic the past few weeks trying to get projects done, an unexpected, but welcome house guest, a wedding to photograph and time to just breathe! All while working around either intense heat & humidity or rain!